![]()
Part 1 Principles
1. Fluorescence microscope
2. Filterset
in FL-Mic
3. How concocal differs?
4.
What is confocal?
5.
Resolution in confocal
6. Optical
sectioning
7. Confocal image formation
and
time resolution
8. SNR in
confocal
9.
Variations of confocal
microscope
10. Special features from
Leica sp2 confocal
Part 2
Application
1. Introduction
2.
Tomographic view
(Microscopical CT)
3. Three-D reconstruction
4. Thick specimen
5. Physiological study
6.
Fluorescence detecting
General
consideration
Multi-channel detecting
Background correction
Cross-talk correction
Cross excitation
Cross emission
Unwanted FRET
Part
3 Operation and
Optimization
1.
Getting started
2. Settings in detail
Laser line
selection
Laser intensity and
AOTF control
Beam
splitter
PMT gain and offset
Scan
speed
Scan format, Zoom
and Resolution
Frame average, and
Frame accumulation
Pinhole and Z-resolution
Emission collecting rang
and Sequential scan
When Do
you need confocal?
FAQ
Are
you abusing
confocal?
Confocal Microscopy tutorial
Part 1 Principles of Confocal microscopy
4. What is confocal?
As mentioned on previous section, a point light soure illumination within the specimen will improve image quality by eliminating stray lighe intererence. Laser is a good candidate for providing a point-like light soure. Unlike a mixture of wavelength, laser provides light at discreted band of wavelength and has very high intensity which are also advantages for fluorescence exitation. For this reason, laser is widely usd in confocal microscope.
 In
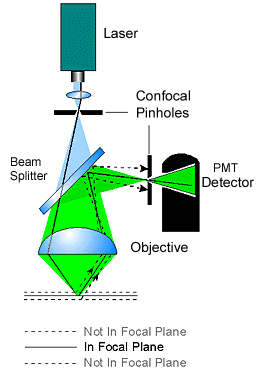
practical, a point-like light source is achieved by using a laser light
passing through a illumination pinhole. This point-like light source is
directed to the specimen by a beam splitter (or AOBS in Leica's BSP-free
system) to form a point-like
illumination in the specimen. The point-illumination move or scan on the
specimen by the help of a scanner. The reflected emission light from specimen's focal
plane passes through the detecting pinhole and form point-like image on
detector PMT (photon multiply tube). In
practical, a point-like light source is achieved by using a laser light
passing through a illumination pinhole. This point-like light source is
directed to the specimen by a beam splitter (or AOBS in Leica's BSP-free
system) to form a point-like
illumination in the specimen. The point-illumination move or scan on the
specimen by the help of a scanner. The reflected emission light from specimen's focal
plane passes through the detecting pinhole and form point-like image on
detector PMT (photon multiply tube).PMT converts detected photon into
electron. PMT has large active area to receive photons thus high saturate point, and PMT has low dark current thus low background, together, which provide high dynamic range that is defined as the ratio of maximum allowed intensity / dark current. Besides, PMT has very high refresh rate since there is no charge accumulate on it. It detects event at nano- seconds level. The electrons convert from photons form analogue current which is then digitized by analogue-digital converter (ADC) and send to the digital image processor. |
Taking together, in confocal system:
-
A point light source for illumination
-
A point light focus within the specimen
-
A pinhole at the image detecting plane
These three points are optically conjugated together and aligned accurately to each other in the light path of image formation, this is confocal. Confocal effects result in supression of out-of-focal-plane light, supression of stray light in the final image
Confocal images have following features:
-
void of interference from lateral stray light: higher contrast.
-
void of supperimpose of out-of-focal-plane signal: less blur, sharper image.
-
images derived from optically sectioned slices (depth discrimination)
-
Improved resolution (theoretically) due to better wave-optical performance.
Is confocal effect a free cake?
No, confocal effect is obtained at a cost of greatly
reduced detecting volume (total signal amount), increase vulnerability to
noise, reduced dynamic range, etc. For detailed discussion, refer section 6:
Optical sectioning.
Statement about this web and tutorial
For problems or questions regarding this web contact
e-mail:
This page was last updated 23.03.2004