![]()
Part 1 Principles
1. Fluorescence microscope
2. Filterset
in FL-Mic
3. How concocal differs?
4.
What is confocal?
5.
Resolution in confocal
6. Optical
sectioning
7. Confocal image formation
and
time resolution
8. SNR in
confocal
9.
Variations of confocal
microscope
10. Special features from
Leica sp2 confocal
![]()
Part 2
Application
1. Introduction
2.
Tomographic view
(Microscopical CT)
3. Three-D reconstruction
4. Thick specimen
5. Physiological study
6.
Fluorescence detecting
General
consideration
Multi-channel detecting
Background correction
Cross-talk correction
Cross excitation
Cross emission
Unwanted FRET
![]()
Part
3 Operation and
Optimization
1.
Getting started
2. Settings in detail
Laser line
selection
Laser intensity and
AOTF control
Beam
splitter
PMT gain and offset
Scan
speed
Scan format, Zoom
and Resolution
Frame average, and
Frame accumulation
Pinhole and Z-resolution
Emission collecting rang
and Sequential scan
![]()
When Do
you need confocal?
FAQ
Are
you abusing
confocal?
Confocal Microscopy tutorial
Part 3 operation, optimization of Leica SP2 LSCM
![]()
Scan format, Zoom factor and resolution
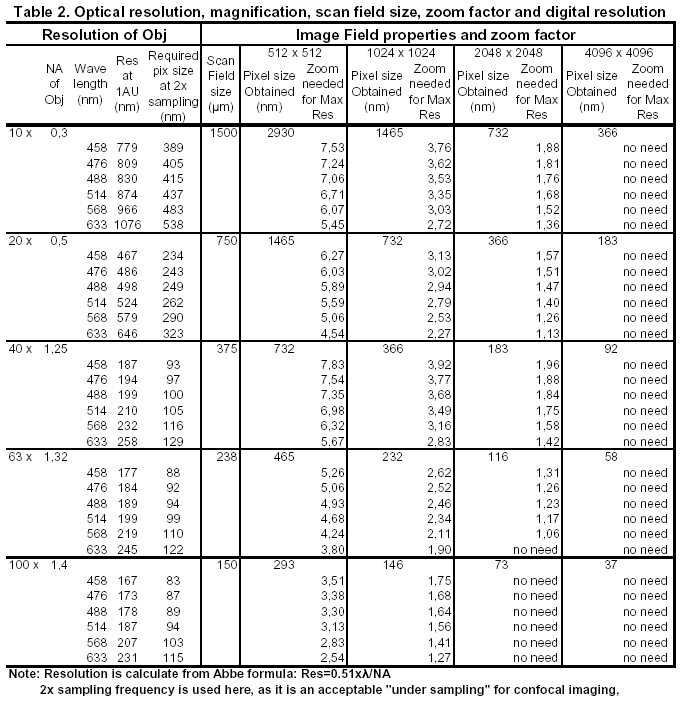
Scan format, as called in Leica confocal software LCS, expressed as 512 x 512, 1024 x1024, up to 4096 x 4096, first number for pixels per line, second number for line per frame scanned, is actually an expression of digital image resolution (it is called image resolution in Biorad and Zeiss confocal microscope).
In digital image field, resolution usually takes the form of "pixels x pixels". The real resolving power of the image, in terms of the smallest detail it reveals, depends on size of the final output. That is, on how big area these pixels are distributed, which determine the size of a pixel thus resolving power of the image during image capture process. The resolving power is finally restricted by the resolution of output device: the dpi value of a printer or display screen. This factor usually is not a concern because there is no sampling anymore, just image-to-screen pixel-to-pixel projection. As long as there are enough sampled pixels in the data acquisition to meet resolution of the objective lens (see details below) and the pixel number is enough to feed the display with its 96 dpi screen resolution, or match the printer with some 72-100 dpi output resolution for a given printout size, there will be no pixelation on the output image.
When producing a digital image, it is often unnecessary to know the exact resolving power, but the total pixel number and its distribution format (digital resolution) must be specified before a digital image file can be produced. This number in turn directly influence the size of an output at certain dpi value before the image get pixelated. For example, a file with 512 x 512 pixels can produce an output up to 1.7 x 1.7 inch at 300 dpi without pixelation, while a 1024 x 1024 file produces up to 3.4 x 3.4 inch output at 300 dpi. The convenience to estimate final output size is the major advantage of using digital image resolution.
In digital microscopy field, it is more complicated. The match between digital resolution and optical resolution of an objective, the match between digital resolution and final output size have to be considered at the same time when you choose a digital image resolution for an image file. On microscope side, choose adequate magnification to make the details of interesting bigger than dot size of the recording device.
Match optical resolution of objectives
Choosing of scan format in confocal system affects function of both digitizer (sampling along a line at the chosen number) and scanner (how many lines to be scanned).
To match digital resolution of an image frame with optical resolution of an objective, one needs considering: how many sampling points need to be distributed in the intermediate image field of the microscope to achieve a pixel size that will not compromise the resolving power of the lens. According to Nyquist sampling theorem, at least 2-3 sampling rate has to be used to resolve an underlying structure, i.e., 16 to 36 pixel sampling per Airy disc of a objective lens is needed to guarantee its optical resolution being represented in the acquired digital image.
Taking an example by using 40 x objective of 1.25
NA, at 488 nm excitation:
First, from the optical resolution of the objective: Res=0.51*488/1.25=199 nm
If Nyquist sampling frequency of 2 is used, 199/2=99.5 nm; If sampling frequency
of 1.5 used, 199/1.5=133 nm (it is said that confocal can use sampling
rate lower than 2 because of its low background). So the required pixel size is
about 100-133 nm.
Then consider the digital resolution of the image
you acquired and its pixel distribution in the field of intermediate
image plane of the microscope:
For Leica IRE2 of FN 22, diameter 22 mm, an inner square in the
circle is diagonally 22 mm and 15.7 x 15.7 mm by side.
For a 40 x objective, using scan format of
512 x 512: the pixel size is 700 nm. It does not meet the minimum
requirement of the Nyquist sampling. If a 5-7x zoom is used, the pixel size
reduced to 100-140 nm, that meets the resolution of the 40x objective at 1.5 to
2 Nyquist frequency (see table 2 below for scan format required by each lens for
matching its resolution).
Table-2 shows that 4096 format produces very small pixel size that does not require any scanner zoom. Is it a perfect solution that you can routinely use? No, unfortunately, this format makes pixel dwelling time extremely short. Taking 400 Hz scan speed as example, one line uses 1/400 s that is 2.5 ms, each line is divided by 4096 that makes each pixel-dwelling time down to 0.6 ns. For such a short signal collecting time, the signal is extremely weak, the SNR and image quality become very bad without compensation by slow scan speed and high number of average. At 200 Hz scan speed, a 4096-line frame need 20 seconds per frame, and 8 times or more average makes the total scan time up to 2-3 min, then bleaching become a problem, the high optical resolution you expected by using high digital resolution lost in the noisy, bleached image.
So, the optical resolution is not the only thing you need to consider. The question then become: do you need that 200 nm resolution? or does your specimen provide that small details for the confocal system to resolve? If not, you can take it easy: use lower format plus some zoom factor to get a good image that shows everything you can see from microscope. Or use reduced area by scanner zoom. Table 2 tells us, that by using 1024x1024 scan format, a moderate zoom factor 2-3 meets all objective lens's resolution and is recommended for most applications.
Scanner zoom factor vs. digital zoom
Digital zoom simply blown up an image to a bigger area with its original pixel numbers, that soon reach the limit of screen dpi value and image become pixelated. Some image edit software provide pixel interpolation which avoid pixelation when enlarging an image, but image quality deteriorate with massive addition of pixels. In both way, image resolution do not become better.
Confocal scanner zoom is a totally different story. The zoom-in function reduces the scan angle that in turn reduces the scan area. With a smaller area scanned (enlarged) using the same pixel number, the pixel size reduced. So, confocal zoom enlarges the image at the same time improves the resolution.
Meet image size requirement of the final output
If the resolution is not your main concern, if you
are satisfied with the details presented on the screen already, then
choosing scan format become a question of what is the size of the final output.
For example, a 512 x 512 image file can produce a 1.7 x 1.7 inch ( 4 x 4 cm)
print-out in 300 dpi printer resolution (512/300=1.7). 1024 format produce 3.4 inch
(8 x8 cm) at 300 dpi, A 4096 x 4096 image file can produce
32 x 32 cm print-out
in 300 dpi. Do you need this size for a single cell if you are not making a
poster?. Think about what is the final output size you are going to
use, choose a comfortable scan format to work with.
Note about printer resolution: most high quality, professional dye sublimation color printer use 300 dpi. Some journal ask for 600 dpi just for their easy of resizing. Don't using resolution claimed by inkjet printer as the reference for calcuation. 1200 or 2400 dpi might just equal to 300 dpi in dye-sub printer.
Summary:
When choosing scan format, decide which is your
priority.
1. Achieving highest optical resolution. Good, everyone likes high resolution
image. But how high should it be? Reach the limit of the optical resolution an objective
can provide (200 nm or 150
nm that in turn requires 70-100 nm pixel)? Do you need that small or does the specimen provide that small details?
Or even if your specimen provide it, after choosing such a small pixel format,
is signal intensity and SNR still enough to convey such small detail?
And finally, is it worthwhile to take a painstaking process for a very high
pixel-format
scan? Will the final image reward your efforts?
2. Meet the requirement of output image size while maintaining good image quality and easy of image optimization and processing.
3. Compromise between 1 and 2.
For all objective at different excitation wavelength, refer table 2 for their resolution, field size, minimum zoom factor needed for the highest optical resolution of it. Using 1024x1024 scan format and a moderate reduced imaging area (2-3x scanner zoom factor) satisfies most cases.
Table 2.
Optical resolution, magnification, scan field size, zoom factor and digital
resolution
see:
PDF file
![]()
Statement about this web and
tutorial.
For problems or questions regarding this web contact
webmaster
This page was last updated 08.12.2009